
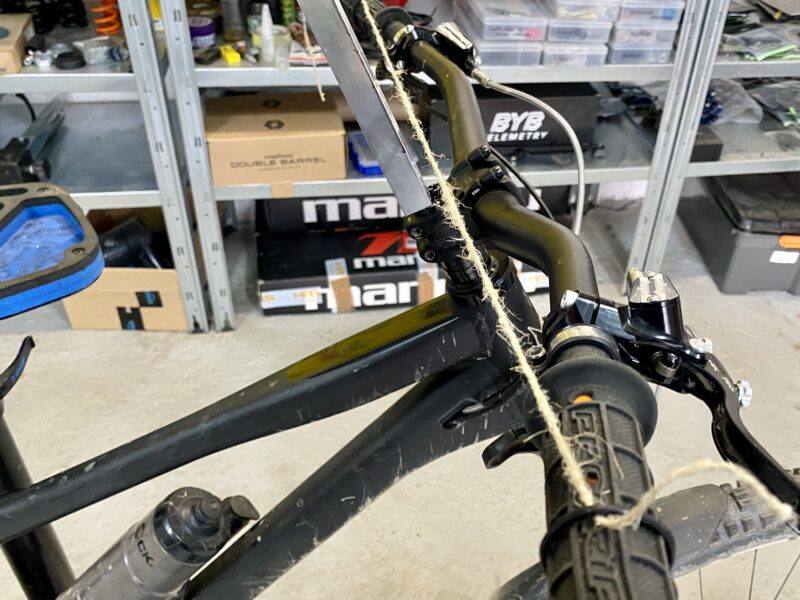
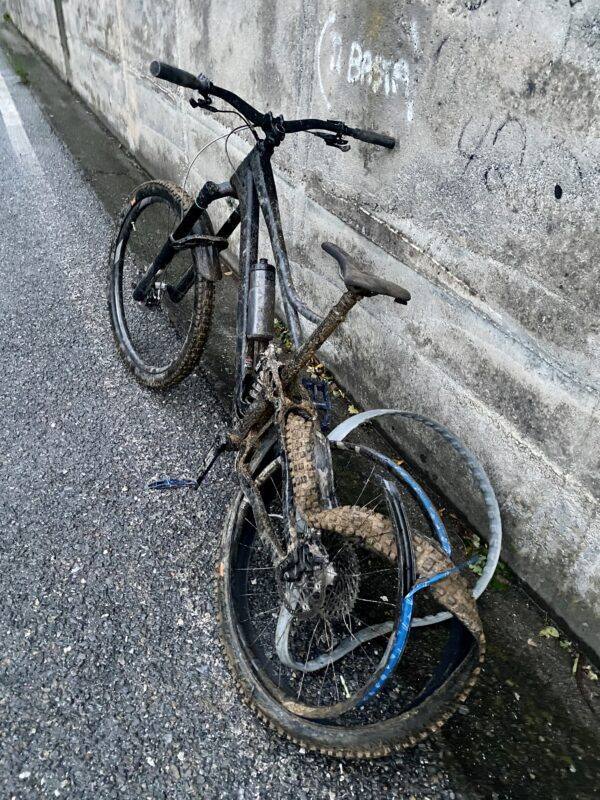
Banshee Titan – Custom Built Downcountry Attempter
For those of you who are new here, my goal is to bring the best and most independent reviews online. After a lifetime of riding and racing bikes, guiding, coaching and working as a Technical Editor including 5years at Pinkbike as their head of European Tech; I worked within the industry working with brands directly to test and promote products, but, I wanted to do something different.
I’ve bought a farm in Italy to build a private test centre. The end goal is to have repeatable test tracks, and a fully loaded workshop including suspension dynos to give you real-world data about these products, plus some other test jigs I have my eyes on. All these products are paid for at full price from brands or shops so I can give independent opinions. I will never allow “It was a preproduction prototype” or any of that nonsense.
Full disclosure: Banshee sent me this frame FOC in November 2021 to test and give them feedback on. This didn’t go to plan last winter, but they were happy to let me test this independently, publish here on my site and give it away in a competition.
It’s been a long time coming. Tip: don’t try and custom build yourself a new bike from scratch when there’s a pandemic, global bike parts crisis, you’re homeless, workshop-less, in-between multiple countries that all have border restrictions and you’re living in a campervan! Bikes are difficult enough to custom build with all the different standards, fitment issues and specific tools without all of those aforementioned problems.
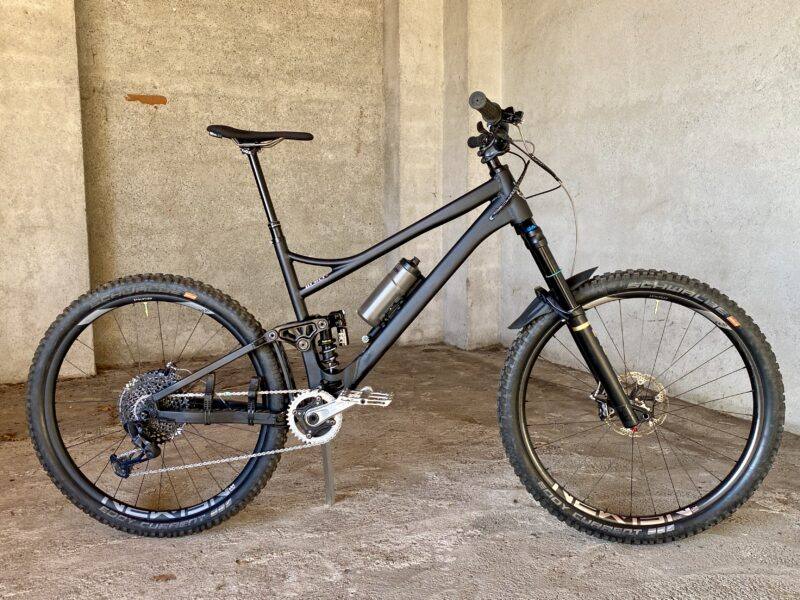
Anyway, I chose the XL Titan for my 185cm height (plus my stupidly long 197cm arm span) which has a 495mm reach. Not as long or slack as most bikes I’m used to riding recently, but with the head angle being 64.5º/65º as standard (depending on the rear dropout hi/lo settings) it should size up more similar to a 510-515mm reach bike with a 62/63º head angle. This is because a steeper head angle effectively extends the reach or fit of the bike compared to a slacker one, the reach is measured to the top centre of the headtube but your handlebar could be anywhere from a few to 20cm higher than that, so the head angle can make a big difference to the bike fit.
I wanted to build a lightweight, ‘Downcountry’ bike as people are addicted to asking about bike weight instead of its actual riding performance. With my 210mm travel custom G1 from last year – which I thought was ground-breaking – the most popular question was about its weight. Of course, it was heavy because I’m just an unemployed and poor bike rider trying to push things forwards using what the market offers. I’m sure a big-budget brand could knock up a similar progressive bike with a lighter weight to test quite easily.
I’m still looking for any evidence that lighter bikes can descend faster, I’ve only seen and heard the opposite. Even ascending faster comes down to a few seconds per hour, per extra kilo of bike weight, which I don’t think is particularly important if you had four pints last night with a curry, are out on a Sunday ride with a multi-level riding gang and you didn’t clean and oil your worn out drivetrain after last weekend. Who cares if you get to the top of the hill five seconds in front of someone else, you’ll probably chat for half an hour and spend ages faffing, peeing, checking tyre pressures, adding or removing layers etc.
I’m also yet to have someone tell me my bike is too heavy to ride and then beat me to the top of the hill and I am super lazy and weak nowadays. But, I thought I should try to build a bike tough enough for real mountain bike riding that is also lightweight. This started well, but ended up around 17kg, if it was 12kg with the same reliability and performance I would take it, but lightweight parts can be disposed of pretty quickly on the trails of Liguria. 17kg is the actual weight of the bike including all the things you need to ride like pedals, bottle and cage, the OneUp EDC tool and tyres that won’t tear on the first turn. No bullshitting here by taking the pedals off and any other bits to hit a nice number on the scale. Banshee’s website claims a frame weight of 3.95KG (8.7 lbs) for a Medium black anodized frame including Float X2 shock, dropouts w/axle, and seat post clamp.
This is a fully custom Downcountry build around a solid frame with good geometry and a decent amount of travel. Not as lightweight as I hoped as the build evolved as lightweight parts failed…
Banshee Titan XL, Black Anodized – €2349
I picked the frame up last winter from Loam Distribution, the French distributor in Thonon Les Bains, down the road from Morzine – handy if you’re in the area with your Banshee and have an issue.
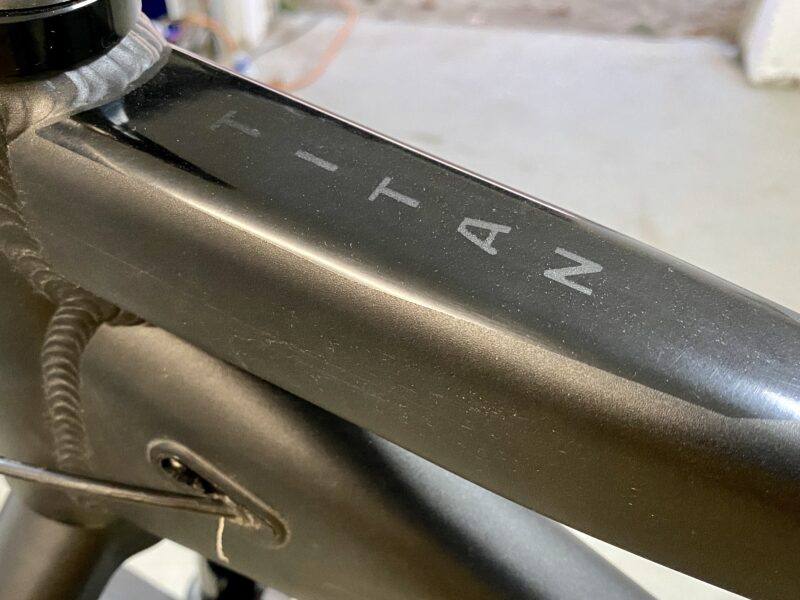
I’m a big fan of the stealthy shot-peened anodized black, it’s hard to keep it clean, but you can abuse the finish for years, give it a thorough wash/dry and it will look like new. It’s much more hard-wearing than paint and protects raw alloy from oxidising. I’m not a fan of paint on bikes in general, I think they are a tool for a job and the paint is purely for fashion. It adds precious weight and makes your bike harder to look after – I’ve had a number of anodized and raw bikes over the years and they make life less stressful, haha.
The Titan frame got on with the job well through the various stages of setup. But really came alive when we got all the settings dialled in. The overall shape of the bike feels great, and the longer +10mm dropouts should be delivered as standard on the L and XL sizes – my bike came with the standard dropouts for a 450mm chainstay – a decent length in this world of ‘shorter CS is best’ which I do not fully agree with. I’m still waiting for any brand to prove to me that shorter chainstays go around corners faster – we are only told this in marketing copy and I would love to see some scientific evidence or at least an attempt… My testing says a balanced bike will be the quickest and easiest around any corner – and I have ridden an eMTB with 495mm chainstays around Swiss hairpins without a problem.
The geometry isn’t fully ‘new school’ but isn’t far away with the -2º Works Angle Headset I installed. I’m sure 62.5-63º will become the standard for nearly all MTB’s in the next few years – it nearly is already. Hey, haven’t MX bikes 63º as standard for years?
The seated position is great and the BB isn’t extremely low – another thing I am not a fan of and this will ‘fad’ away (get it?) over the next few years – I predict we will end up mostly with mullet setups and 0mm BB drop. I ran the dropout in the high position for a slightly better seat angle, and I like a higher BB for the chunky rocky trails of San Bernardino/Caprazoppa in Finale, I also ride flat Pedaling Innovations Catalyst pedals so have less ground clearance than someone on very slim clipless pedals.

Start pedalling on the Titan and the rear suspension almost feels ‘loose.’ This one is tough to explain, but in the initial portion of the travel, the bike is extremely active, bouncing around almost. This feels strange on the road (you can solve this with the Climb Switch) but really seems to help with traction over rocks and roots when climbing off-road.
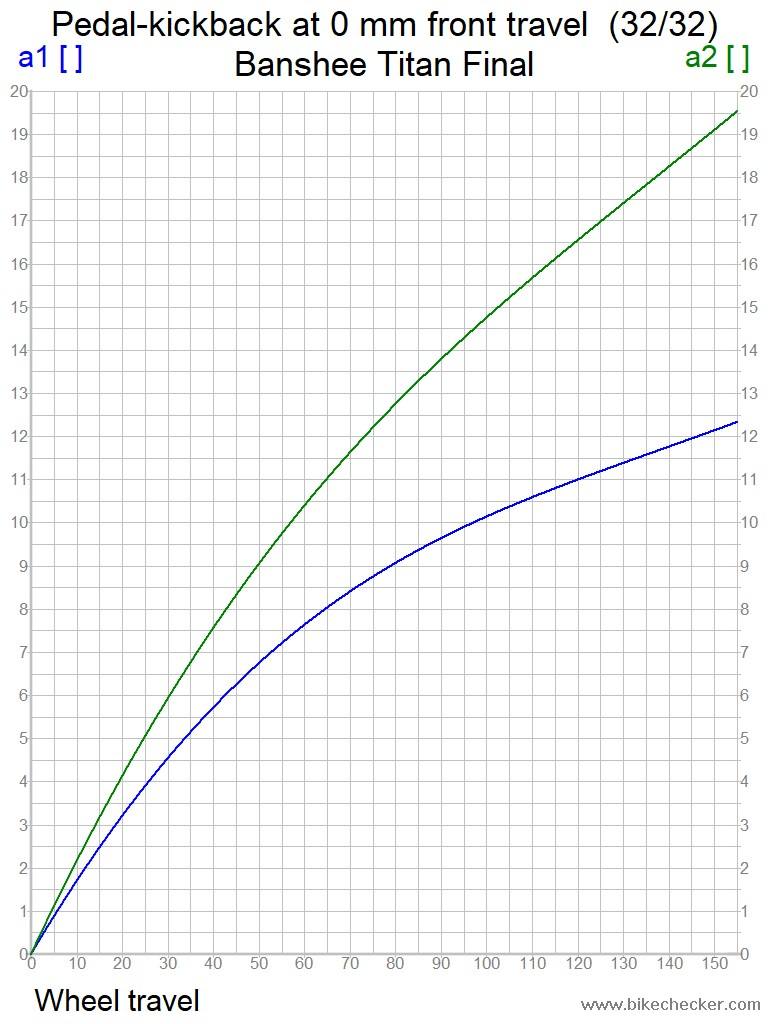
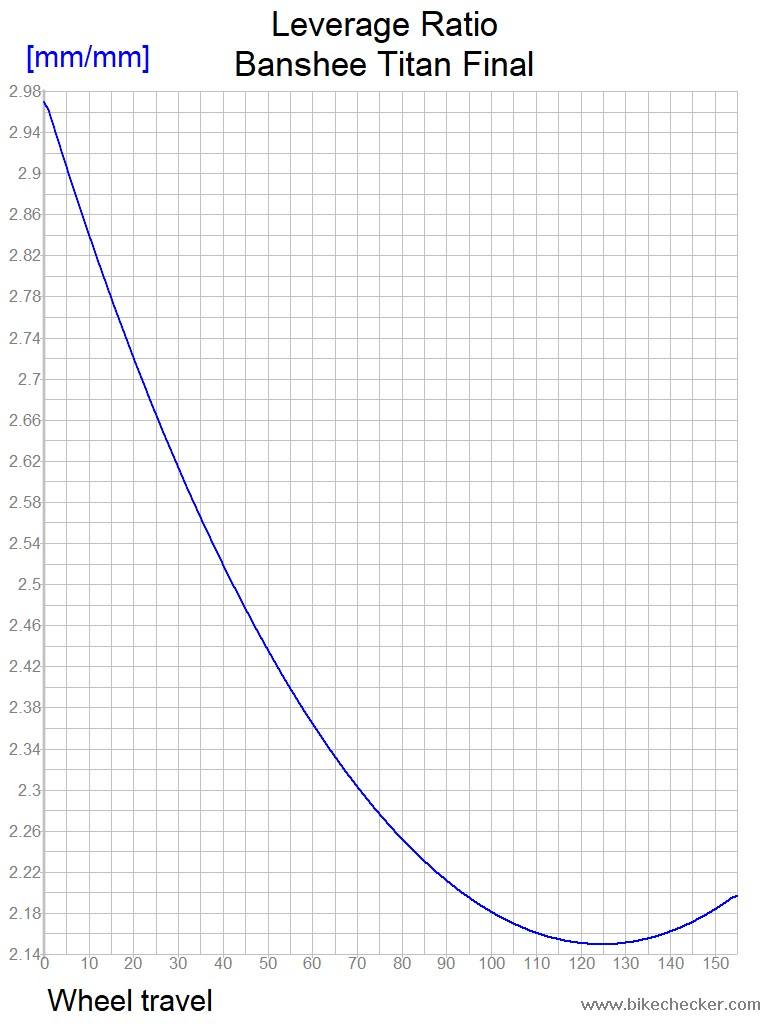

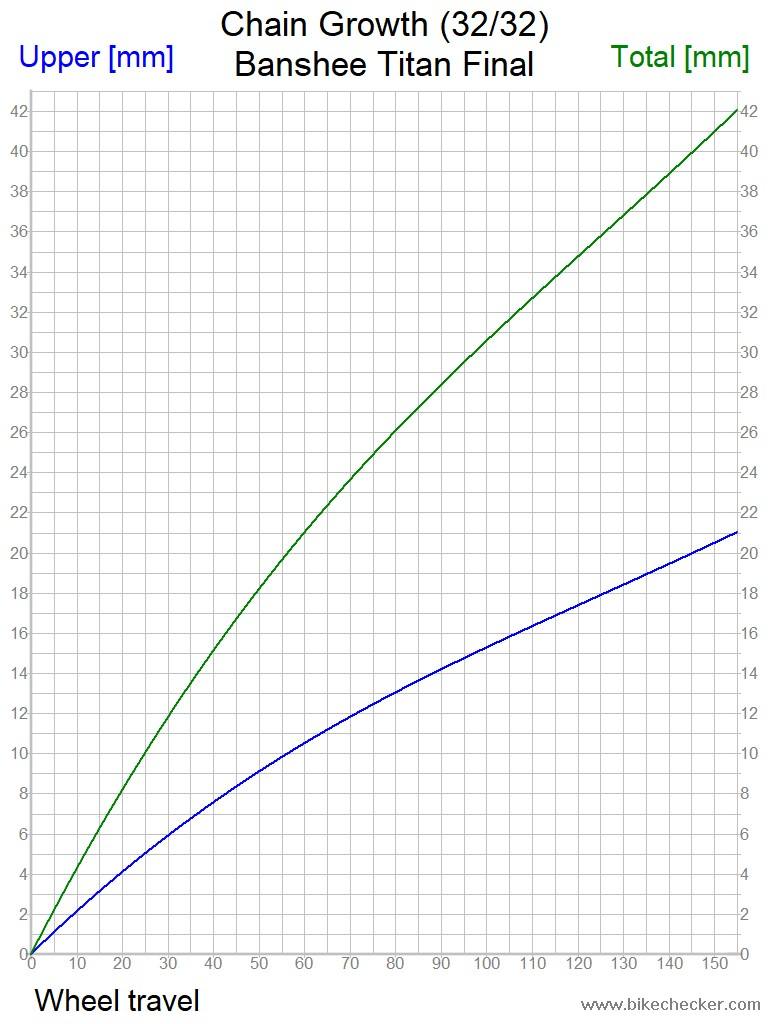
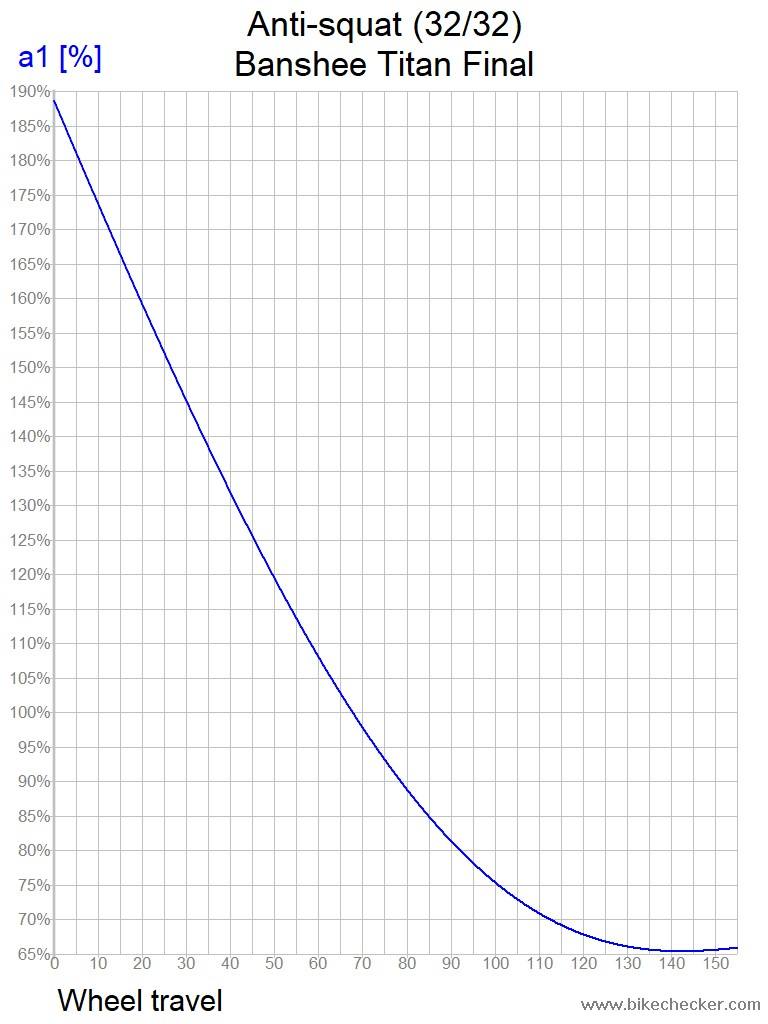
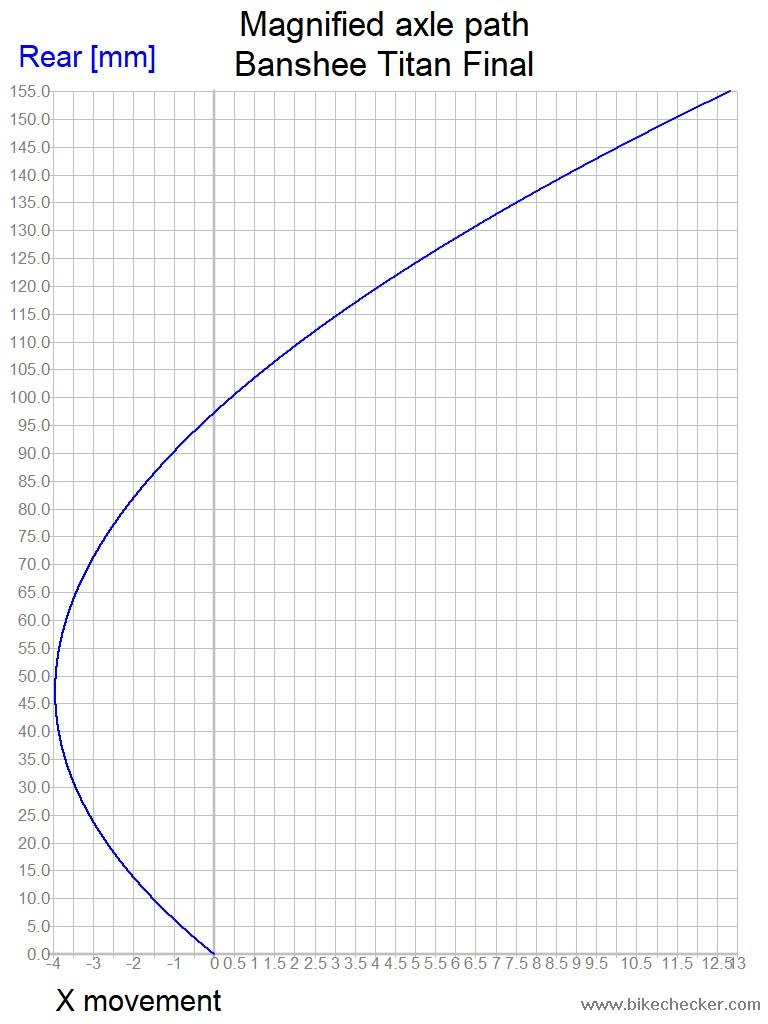
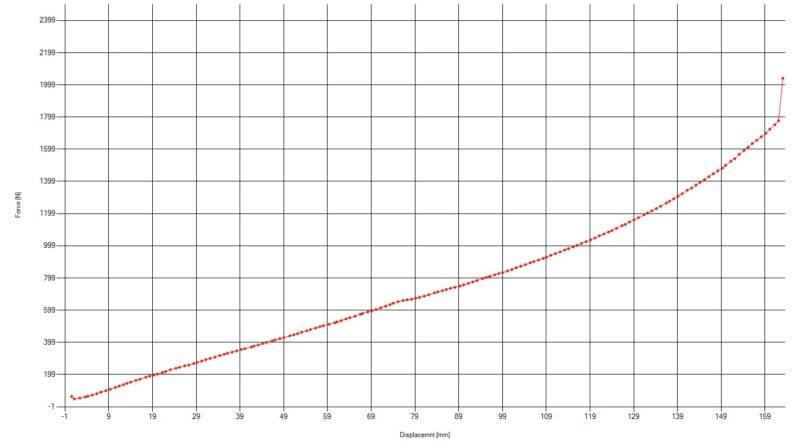
Banshee are happy to show their kinematic data, they say they have nothing to hide and provided this for free.
Kinematic data is a good way to work out what your bike is doing and how much sag you should have for optimum setup.
The anti-squat starts very high and drops off rapidly. Getting the sag correct here is an important factor, 32% is going to be about 50mm of sag which puts you in the 100-130% anti-squat range (depending on gear factors) which will give firm pedalling. The closer to 0mm travel, the AS gets much higher, so I think the loose feeling is the bike is lifting itself up as you put the power down, then dropping back as your power delivery is basically ‘off’ twice per crank rotation.
The rear suspension is really active in the first 1/3 but it keeps the chassis sitting up in its travel while floating and gripping when it needs to. This is despite 32% sag measured standing up, which is going to become more when seated and heading up a steep climb. Thumbs up for different, but great climbing characteristics.
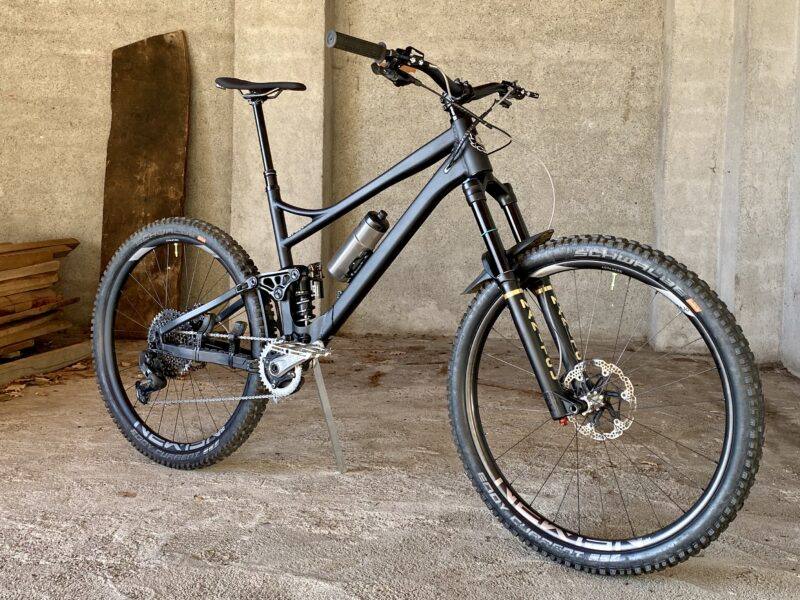
But the Titan is not really here for that, it wants to go down hill. It’s a fantastic descender. Again, extremely supple in the first part of the travel, great midstroke support and massive bottom-out resistance – this combination coming from the frames design and the Kitsuma shock – this frame could easily have less end stroke progression with the capability of the Cane Creek. I’ve probably been the main promoter in bike media for ‘modern geometry’ over the years, mainly since the first review of the insane Nicolai GeoMetron that I championed from day 1. 2015’s insane is nearly normal in 2022. Yes, the Banshee could be a little bit longer and a little bit slacker, but with the setup the size was ample more than stable enough and a great balance.
It’s a pretty stiff bike, tracks very well and is solid under standing pedalling loads.
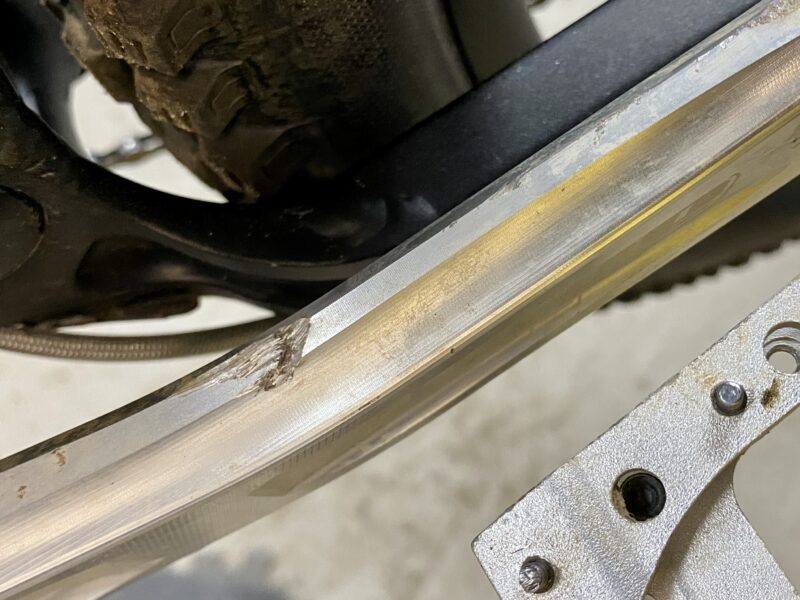
In general, I’m not the biggest fan of the way dual-link bikes flex: a wide-angled, one-piece and stiff rear triangle mean more flex will come from the middle of the frame at the two links that rotate on the bearings. This means more lateral flex of the frame (bottom bracket swinging out horizontally as you look down on it in riding position) and less flex at the rear wheel axle torsionally. Imagine a rider in front and looking at their rear wheel – on a dual-link bike the whole wheel can move left to right under load. The Titan is plenty stiff enough in this area due to the huge forged ‘Shock Cage’ around the shock, which is one piece that carries the BB shell, the lower shock mount and sandwiches the lower-link – this is a nice piece of engineering. The upper-link is massive and bridged between the two sides, and the chainstays are internally ribbed for more stiffness. All this adds up to a massively stiff frame laterally and does not have the ‘folding in the middle feeling’. I would like it to allow the rear wheel to twist a little more torsionally, to prevent too much deflection on awkwardly angled objects, but we mostly covered those with very responsive suspension and low tyre + spoke tensions.
My preferred design, in general, comes from something like a Commencal Supreme, Orange or Ancilloti. The main pivot provides the stiffness and the bulk of the material is around there to give good lateral stiffness in the centre of the bike. These single-pivot triangular swingarms then taper towards the rear wheel and can allow it to flex more torsionally. Now, let’s say we’re following a rider on this type of bike. The rear wheel of the bike you are following will flex less left to right, and more in a clockwise/anti-clockwise motion. Less torsional stiffness at the rear axle will let the tyre contact patch stay connected to the ground more, while the lateral flex in the middle of the frame means it will move left to right more and can deflect more off angled obstacles and feel vague. Of course, all of this is a generalisation and depends on each individual bike.
Anyway, the Titan is pretty freaking good through all the rough stuff, though its stiffness is more suited to shralping berms, trail centres and pedalling efficiently than providing mega grip in the absolute worst off-camber rocks and roots. Like always, the overall setup and suspension is the real key here creating the grip, which the bike did all while allowing me to hit anything as hard as I wanted. If I was stronger and less scared I could push this bike very, very hard. I’ve never felt a serious bottom out, if at all on the trail.
So not my frame design/layout of choice, but I’m nitpicking here and 99% of people wouldn’t get to this stage of over-thinking. The benefit of this kind of dual-link design does mean that all the other parameters of the frame kinematic and ride quality are easier to design, and overall Banshee has killed it – its well worth a look at the in-depth tech on their site. It’s also worth mention that this frame uses 7005 alloy, which offers increased stiffness plus better tensile and fatigue strength over the most popular 6061 alloys.
After some time and tuning, we basically got the bike to the perfect setup:
Initial travel – Plenty of sag for grip (more sag means the wheels can drop deeper into holes helping to keep the tyres on the ground), very low friction and super supple for a smooth ride. Maintained good climbing characteristics with CS engaged on roads and open for off-road. Last ride I was running 32% rear and 20% front sag.
Midstroke support – all you could ask for, including chassis stability under braking, support for pumping, support in berms, and support to push the bike into cambers or loose dirt to create traction. Also, there was zero noticeable *overshoot/blowing through the travel, this means the bike is very stable especially in rough stuff – every bump hit is absorbed, slowed down nicely and quickly returned to sag. Characteristics under braking are another key to chassis stability, and the Titan is around 85-100% Anti-Rise throughout the travel, this means the rear brake is not pulling the wheel into the travel, or letting it extend extensively – lots of modern ‘Horst Link’ bikes have very low anti-rise, which people think means they have active suspension under braking, but I find anything under 70%, and some bikes closer to 30% means the rear shock will extend under braking – tipping your chassis forwards at exactly the time you do not want it to – the Radon Render is a great example of this. While the rear suspension might be freer to move while braking, you can’t slow down if there is no weight on the rear contact patch!
*An extreme example of ‘overshoot’ means that you hit a 100mm bump, there is not enough compression/spring support to slow the wheel down. It will travel too fast and leave the ground and might use 150mm of travel for that bump – this causes all kinds of issues in stability and grip, mainly with the bike using up too much of the remaining travel and having much more work to do than it should have to.
Endstroke – huge bottom-out resistance front and rear. Check out my 2m drop test – before we had the suspension tuned.
Absolutely fantastic. Get all these things correct and you have a bike that is very easy to get on and ride. It will let you push past your limits more easily. It frees up ‘bandwidth’ in your brain, the bike is very predictable and doing its job properly, allowing you to do your job of looking down the trail and setting up for things, getting on and off the brakes at the right time, hitting your lines and generally just sending it the way you imagine in your dreams.
The only time when I felt the bike was not killing it was on a particularly slow and rough track – Black and White in Finale Ligure (previously an EWS stage). I hit this recently with my mate Theo, who I’m helping to race train at the moment. We did a massive physical effort before the track started and we dropped in on our heart rate limits. The tired state, slow speeds, flat terrain and big stepped rocks made the suspension feel quite hard in terms of compression. If I was racing this track again, I would drop a few clicks of HSC from the front and rear suspension to allow a bit more flow through that type of terrain. A nice and easy thing to do with the tool-free adjusters on both suspension units.
As well as the suspension, we managed to get a nice progression through the whole bike: low pressures in the great ‘dual feel’ Super Gravity casing tyres, through the CushCore XC, the wheels and spoke tensions, through the suspension and the frame. A progressive build in stiffness from the tyre contact patch to the heart of the bike, and also a nice smooth lag from bump impact through everything to my hands and feet. This means great grip and support with a minimum of harshness through the complete package.
I frigging love riding this thing and it gives me a similar feel and confidence of the Commencal Supreme DH (also tuned) but in a trail bike version.
But, me being me, I have to moan about something:
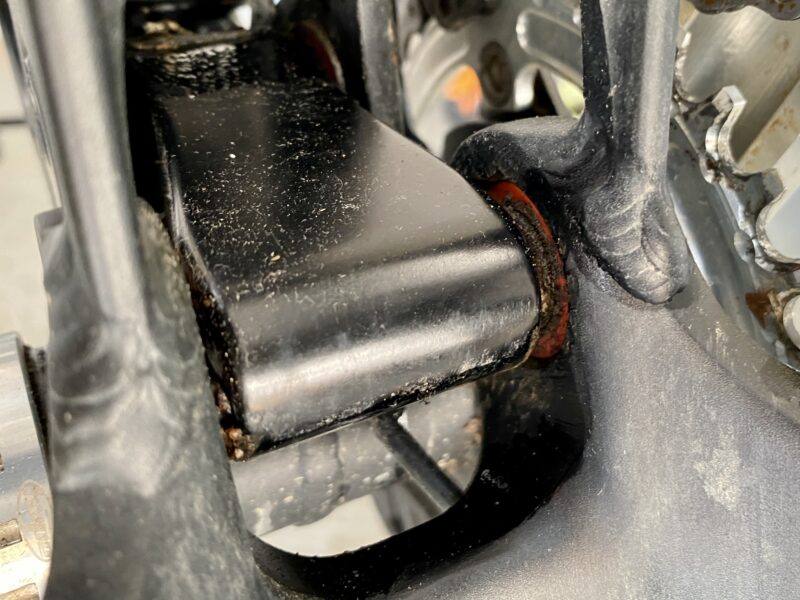
Most of the rear linkage bearings are directly in the firing line of mud and water from the rear wheel. There’s a nice structure that connects the front of the chainstay and seatstay tubes together, but this is open and lets everything through – we could have added some rubber or tape to help this. But, like always, I try to think about these bikes from a pure consumer point of view, I don’t think we should have to cover the bikes in rubber and tape to get the best performance – it would be nice if Banshee offered some kind of mudguard for this area. Simply to stop me from feeling sad when you can directly see mud and water fired at the seals of the cartridge bearings. Luckily I live somewhere mostly warm and dry, so not my biggest problem – if I was living in a very wet climate I would definitely be looking to improve this area.
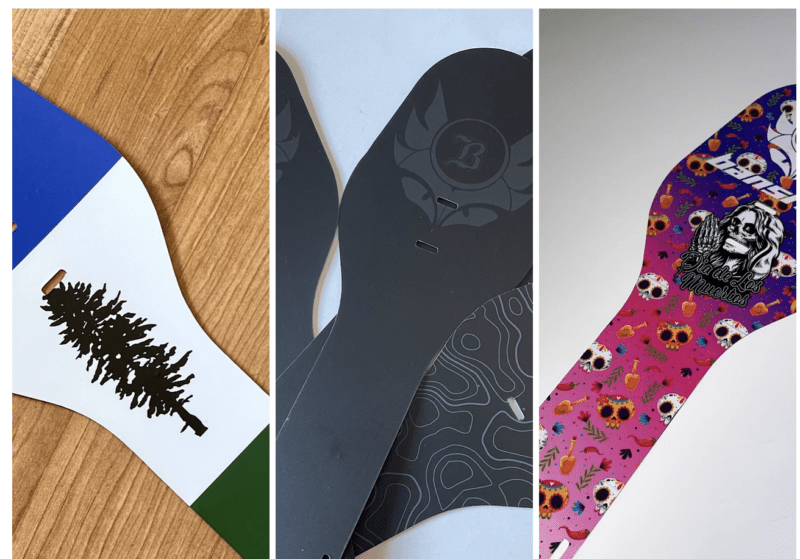
***Breaking News*** Banshee do already offer an open-source mudguard/fender on their site. Download and print this template, then use it to cut any old bit of waste plastic to shape – reuse recycle and all that! Also, Banshee, in conjunction with BecomeUnique.pt you can order mudguards and custom decal kits for your ride.
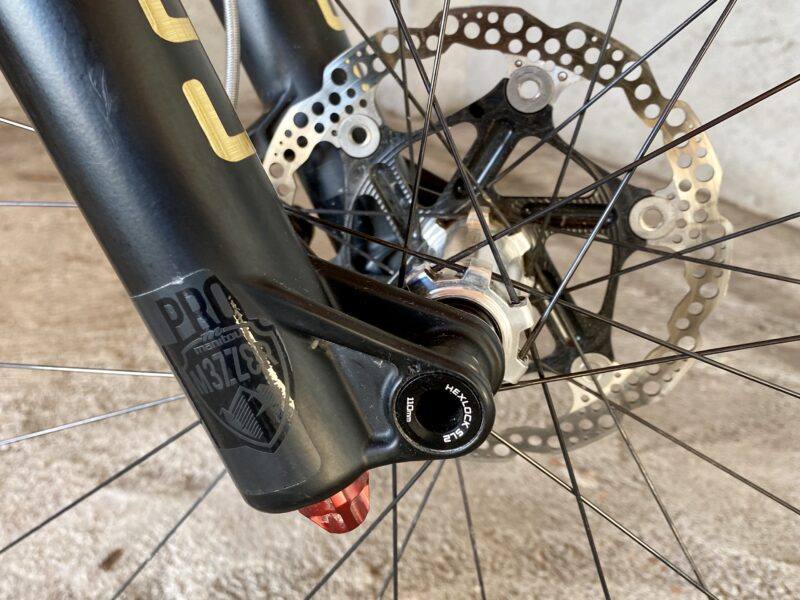
The rear triangle was not perfectly aligned: sliding the rear axle through the dropouts shows this. But, it’s not far off and can be made better by tightening the wheel and axle first and then tightening the dropouts to specification in a diagonal method (like you would do on a stem face-plate with four bolts) to the 12nm spec*. There is some leeway where the dropouts clamp to the frame for alignment.
*This 12Nm spec has now been upped to 16Nm on the Banshee site. My brake-side dropout worked loose twice while riding and did mark the frame a little. I checked with Banshee about this, and, long-story-short they changed their spec-sheet to 16Nm. I don’t think there is much danger of overtightening and breaking these bolts, they are chunky steel and look pretty standard to find at a hardware shop if you break one.
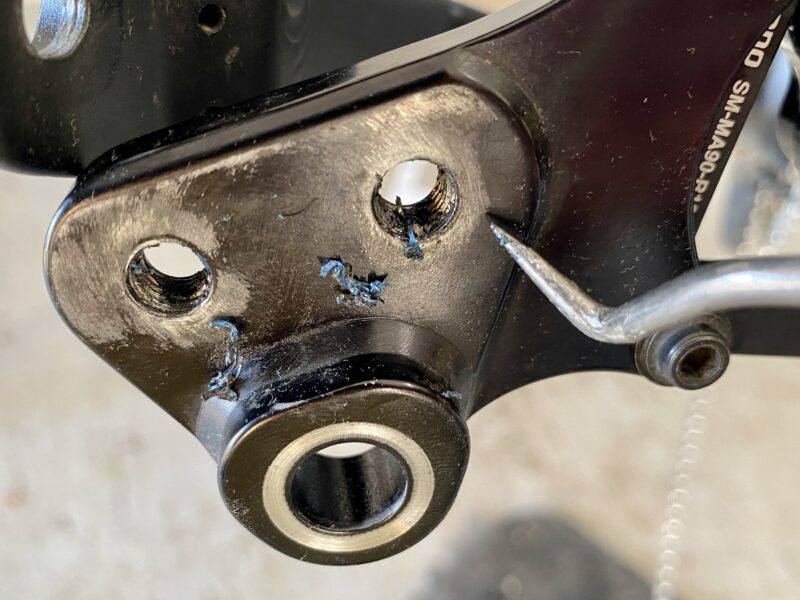
Banshee also mentioned they had had some problems with an excessive amount of Loctite being applied at the factory, meaning the threads would start to bind and would register 12nm on the torque wrench before actually meeting that threshold. I checked mine, and there was a lot of Loctite in there, too much? Hard to say, but after bolting up correctly to 16nm, replacing it with fresh Loctite and removing a layer of grease we had between the dropout and the frame, it did not come loose again. Banshee also says they have custom bolts from a new supplier which should prevent any further possible problems and will be a running change.
I’m not an engineer or bike designer, but I don’t think this is the ideal dropout solution. It would be better if there was some kind of keyed location on the inside of the dropout, it’s a flat surface against a flat surface and relies on the clamping force from the bolts to keep it there.
**Update: I spoke to Banshee about this issue. They said they have tried some keyed dropouts in prototype stages, but these were causing more issues than they solved with creaking and risks of them being installed incorrectly and causing bigger problems. Banshee is confident that the new bolts, and checking the excess Loctite issue will solve any problems here. It was also great to speak to a brand like Banshee who are happy to listen and discuss the issues. Working together to get a solution to improve their bikes, rather than being told that I/the customers are the problem.
Finally, the internal cable routing inside the downtube can rattle a bit, but you can try to tension them either end of the downtube at the upper ports and the zip-tie location within the Shock Cage. Banshee is now supplying their bikes with some foam tubing to damp down any noise.
Frame conclusion. Geometry is nearly perfect, a solid frame construction, the finish and kinematics are all great, as well as its stance which attracts a lot of questions around Finale Ligure where I have been riding this most.
You can read more about all the components below:

ProGrips Moto Grips €20
I struggled with grips on this bike and the Commencal Supreme. My hands were getting beaten up which is rare for me after a lifetime of riding. I was using what I thought were my tried and trusted SQLab 711R push-on grips. This is the ‘Race’ version with no lockring, I was previously using the 711 which is a push-on grip (no plastic lock-on sheath) with a lockring for safety. After some confused rides, we swapped from the 711R back to the 711 on the Commencal and the relief was huge. Even though I thought these grips were the same, they are actually very different in the compound – the 711R is much harder.
So I wanted a new pair of grips for this bike and bought a pair of these Progrip Bike/ATV grips that Rulezman keeps telling me about.
I’m officially an anti-lock-on conspirator, the only performance advantages they have include speeding up people assembling bikes and taking more money from your bank account. The main downside is that MTB bars are quite narrow in diameter and so are the grips. You want grips to be soft and absorb as much vibration as possible – if you replace half of this small layer of rubber with a plastic lock-on sheath you’re simply taking away the grips ability to absorb things – very important for DH runs, long days on the bike and looking after your arms and hands over years of riding. Go and find the University study from Scotland where they found vibrations from riding a bike can be as dangerous as that from big power tools!
These Progrips are made in Italy which means nice and local, have dual-compound rubber and a waffle design. Glued on with Renthal Grip Glue and waiting to be wired when I can find some, but the dry climate here means glue alone is usually enough to keep them secure.
Great soft compound and grip from the outer rubber, and firm below. I guess it’s a progressive grip in this case and doesn’t suffer from too much ‘swimming’ which can give a vague feeling on some soft grips.
Solid product, would recommend.
SQLab parts
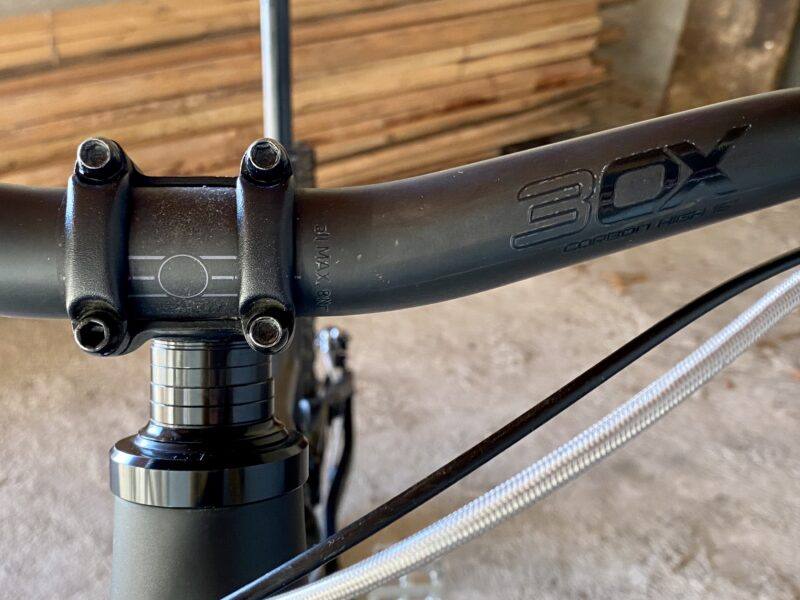
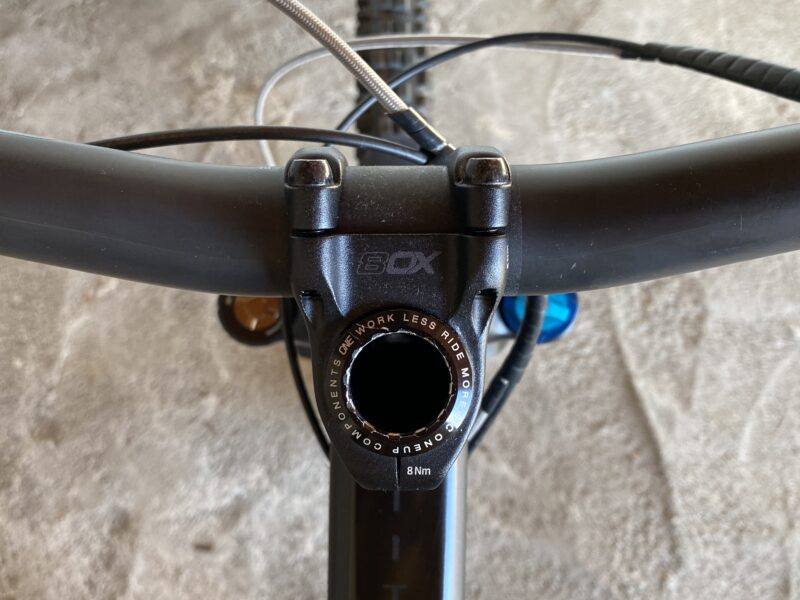
SQ Lab 30X Handlebar Carbon 16º High – €229.95
SQLab 80X Stem, 35mm – €89.95
SQLab 611 Active Saddle S-Tube €149.95
Time to save some weight from the bike and wallet. According to SQLab’s site, the carbon bar is 235g for €230, the alloy bar is 325g and €100. So that’s €1.44 per gram saved – I could never recommend this – please spend that extra €130 on a coaching day, get your suspension serviced or buy some new tyres. Any of those will improve your fun and performance more than any of those grams!
We already dropped the super lightweight race grips from SQLab because they were too hard but continued with success with the other parts. I’m a big fan of the SQLab bars with more backsweep. Going for the full 16º backsweep (I’m mostly using 12º) with 4º upsweep, rotated slightly forward for more upsweep – I believe more upsweep helps to keep your elbows in a strong position. Most people think too much backsweep can cause elbows to collapse inwards and put them in a weak position, but I think increasing upsweep is more important to stop this. This is easy to check by putting your hands out in front of you and moving your hands and wrists to feel what more up, or backsweep feels like.
For me, more backsweep has solved some tendonitis/carpal tunnel syndrome that was building up in my inner elbows, I have a more comfortable position when climbing and also descending. The steeper you descend the further back your CoG will go and more backsweep makes it easier to hold on as your arms straighten out as you move towards the back of the bike.
I think most MTB bars are too straight. Because we started with much narrower bars that needed to be straighter, then they just became wider and wider with no sweeping changes. In a short few years, we went from narrow sub-650mm up to 810mm+. Again, just put your hands in front of you, feel what a narrow bar would be like then extend that – watch how your hand and wrist angle changes. Then increase from 650mm wide to 820mm keeping the angle of your hands the same – you might start to feel pressure on the inner wrists/scaphoid area and inner elbows.
My final thoughts on sweep: all other disciplines of cycling (except road bikes which have multiple grip positions) and sports using handlebars like BMX, Moto and Quad, generally have bars with 10º or more of backsweep. Also, more backsweep brings your hands further back behind the front axle for a safer descending position – just like shortening the stem. With this setup I can easily set the centre line of the bars (a straight line between the grip centres) near the centre of the steerer tube which gives the best steering feel – your hands are pivoting around the steerer tube centre, rather than arcing around it if you have a longer stem. This means as one hand goes forward when you steer the other moves back – keeping you in the same riding position. My current comfortable riding position on this bike put the handlebar centre around 10mm in front of the steer tube centre – It could be a little shorter in a perfect world, but we can’t have everything with currently available products.
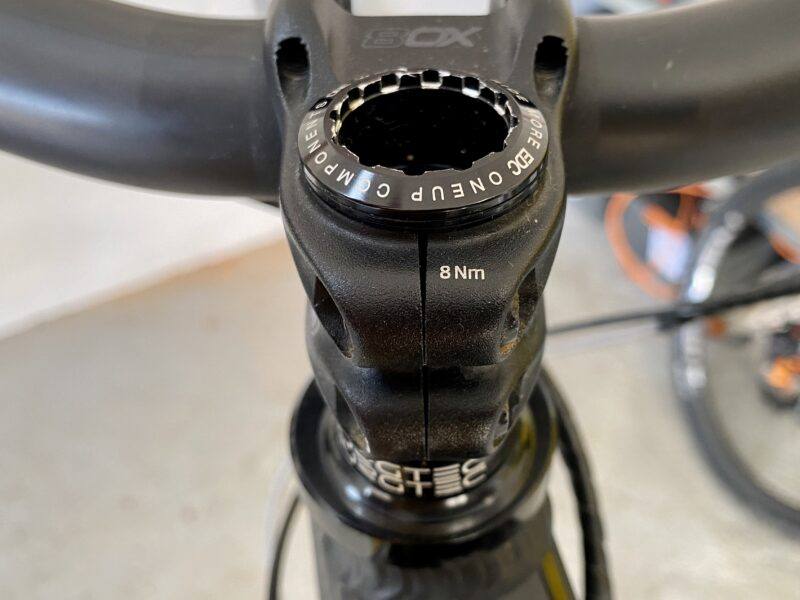
The 80X stem did its job as a 35mm long stem. Decent 5mm bolts all around with an 8nm torque clamping to the steerer. We only bolted these to exactly 8nm torque but the clamping area is now pinching up very close together. The steerer clamp interface worked well and stayed tight – I never trust stem bolt torques after I crashed a few years ago with a brand new stem torqued to its 5nm spec with a brand new torque wrench – the stem twisted on the second corner and bang: ALWAYS check stem tightness before you ride: put the wheel between your legs and give a good wrench on the bars to check. If it moves, you need to overtighten it.
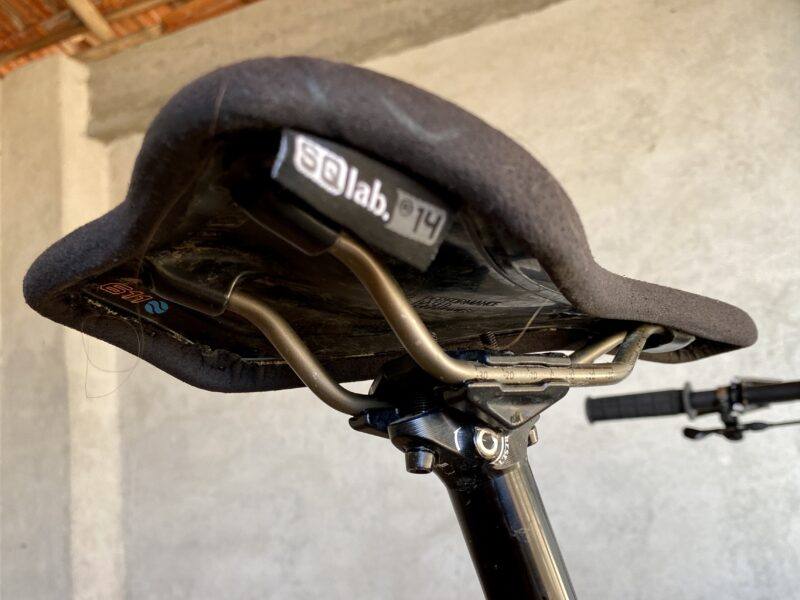
SQLab saddles are still the best on the market I think, this one is lightweight too, woohoo, with Ti rails. But the velour-type material just absorbs water which sucks, I’ll not bother with this one again and stick to the normal ones with the water-resistant faux-leather material. The Active rocker of the saddle makes climbing more comfortable, and the raised perches support your sit bones well – provided you measured them properly and chose the correct width saddle for your riding discipline. I have 10cm wide sitbones and a 14cm (or 13cm) works well for an upright climbing position.
Works Components Headset -2º £55 / €65
After looking at the geo chart I chose a -2º headset from Works. These are cheap and cheerful headsets whose bearings last a decent amount of time, plus you can buy the bearings and spare parts separately in their store and they are made near where I grew up in Cannock.
I wanted to run the bike in the high setting at the rear dropouts which would give a 65º head angle. On paper, 63º with the Works headset and a little less with the 170mm travel Manitou Mezzer, but the high dropouts give a slightly steeper seat tube angle and more BB height and clearance.
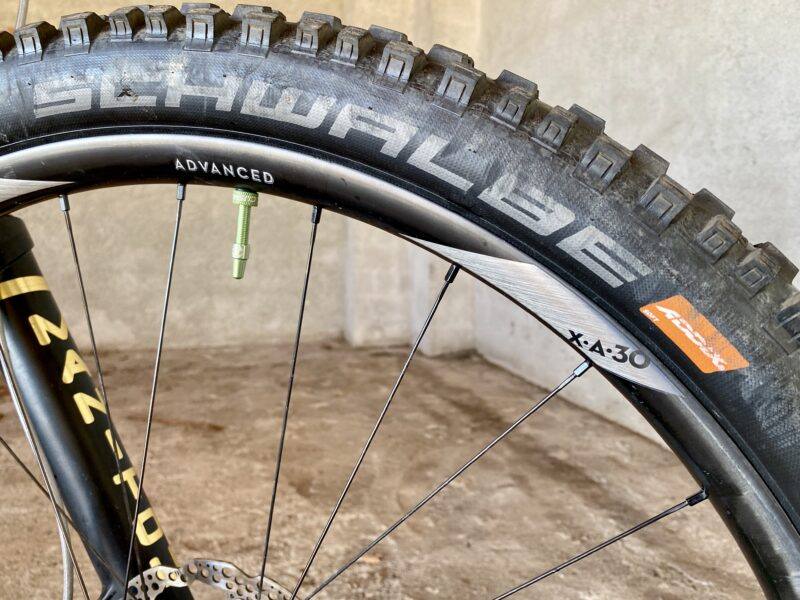
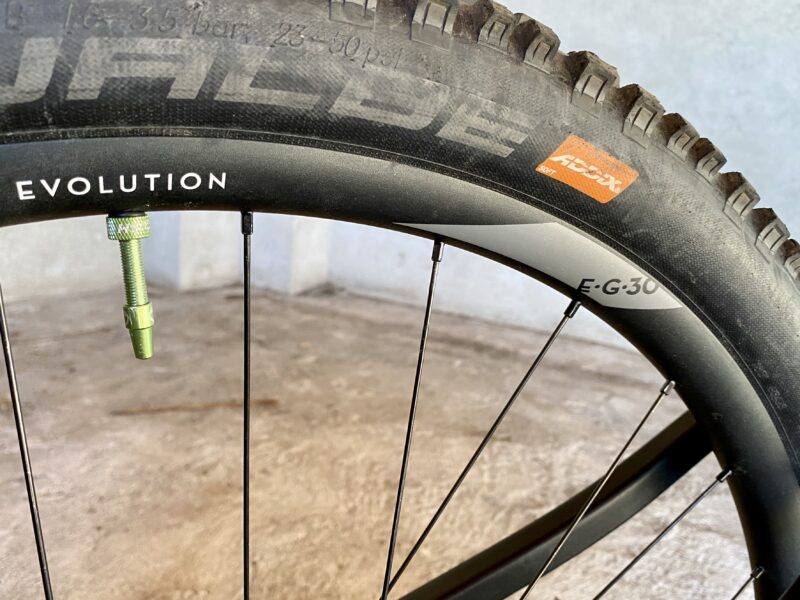
Newmen Advanced SL X.A.30 Carbon Front Wheel €680
Newmen Evolution SL E.G.30 Alloy Rear Wheel €400
These wheels caused a lot of delay, not the wheels fault but mountain bikes fault as it caused a lot of faff with not having correct Centrelock discs, then the correct ones being lost in the post, and not having the right freehub body as we changed parts along the journey. Originally, I was going to run the Rotor 12x hydraulic gears, but I had already installed this on another bike and the hydro-hose was too short.
We tried to make it work, I needed to order a €120 bleed kit, but couldn’t find a replacement hose – I only found one online for €50! Yes, €50 for a few metres of plastic tube, but it was sold out. We bled it and set it up, turned the handlebar and the too-short hose ripped out the derailleur with barely any force. We gave up on that, waited 2 weeks to get a different freehub body for a mere €80, then finally chucked some old SRAM Eagle stuff on.
Anyway, the wheels. These were a pair of superlight SL X.A.30 carbon wheels which was one of my gateways to becoming a part of the Down Country Club at a draggable 1285g pair in 29″. I had great success in the past when working with Newmen testing their fantastic A.30 carbon wheels which are probably the best on the market. I only ever broke one, but I was doing a full-on DH race on those 465g enduro rims. In hindsight, I’m pretty sure the failure came from the chunky CushCore valve, hitting a bump directly on top of the valve, which pushed it down into the rim bed and catastrophically split the rim right across the valve hole – of course, this happened near the end of a fantastic race run after I had been trying to kill the wheel for prototyping/research for months and months.
And this is why I don’t believe in Downcountry. Build a bike with light parts they say, it will be more fun, they say…
What wasn’t more fun or more efficient?
Walking down the mountain, for nearly 2hours, carrying a bike with a rear wheel in pieces, on a December Sunday evening, alone, in the dark, in the rain and suffering from the tail end of a hangover. Definitely less efficient than 100g of rotating weight!
I did hear the rim fail, striking a rock going over a crest, but I couldn’t stop before it was really too late, heading down the 20metre rocky chute, losing air through the cracked carbon and then the wheel completely failing before I could stop.
So all of this wasn’t very efficient and wasted a lot of time walking, getting picked up, ordering a new rim and building it. Everyone should just put some wheels on the bike that will handle the job of mountain biking: I don’t want to go out for a bike ride, then have to avoid certain trails that I am now standing at the top of because they are ‘Enduro’ and my bike is ‘Trail.’
The front SL X.A30 is still going fine, but I am always light on front wheels. The rear has now been replaced with an E.G.30 alloy and is probably the best and strongest alloy rim on the market. The flared rim walls make a massive difference when protecting against dings, and now I feel safe riding down any mountain bike trail on any mountain. The polished Newmen Fade hubs have had no problems yet.
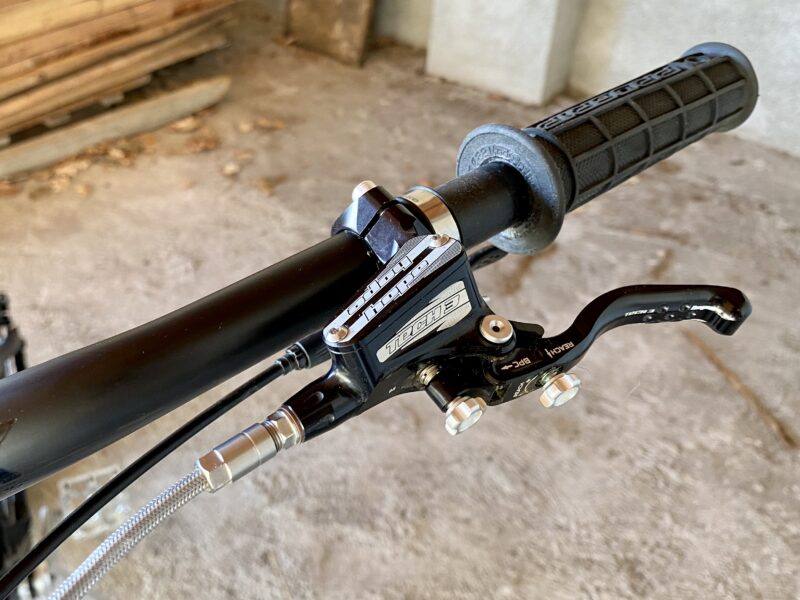
Hope Tech3 E4 brakes, braided S/S hoses £370 / €433
180mm Floating Rotors £90 / €105
Galfer Green Pads €50
I’m a big fan of Hope brakes. Chunky, reliable, always decent-sized bolts, plus you can order any spare part for any of their products ever made.
I always go for the stainless steel braided hoses as these are much tougher than plastic hoses. You could easily die if one of your brakes fail and I have seen too many hoses crushed or split by crashes, flying rocks or being badly packed in the car/van/shuttle trailer. Forget plastic hoses, get reinforced ones – your life can depend on it.
I wanted to use 180mm rotors as I hate brake mounts. It drives me mad that marketing departments tell us how every part of a bike has been perfectly optimised and engineered to save every gram here and there. Then a silly bolt-on brake mount is used to get the correct size rotor for the job. Some brands even manage to design a bike for 180mm rotors – then all of their complete bikes models come with 200mm rotors and mounts – obviously not good communication between the designers and the product managers. I bet the mechanics assembling hundreds of these bikes love them! Brake mounts adds faff, more things to go wrong, and more scary grams – but worse than that, when you need to change something there will not be the correct one in your box of ten spares!
Overall these E4 brakes were underpowered: 180mm rotors on 29” wheels are more like 160mm on 29”. The E4 is less powerful than my preferred V4. And the Red Galfer pads suck, I think. Lacking power and really easy to overheat even on short runs. I finally managed to track down some Galfer green which solved these problems, a huge improvement, but still lacking in pure power compared to the vicious Formula Cura2 or MaguraMT7 which are also in the garage.
I’m also a fan of the purple Galfer that I have used on Hope for years, and I have no idea why these other compounds exist. They all seem to be the same price, and according to Galfers’ own performance charts, the Green and Purple are the best performers in every way.
The new Tech4 lever from Hope is coming and promises 30% more power which would be a great upgrade for the smaller E4 calipers if you want to use 180mm rotors. These brakes are the only thing I would really like to change on this bike, but at some point, you have to stop and get these things given away!
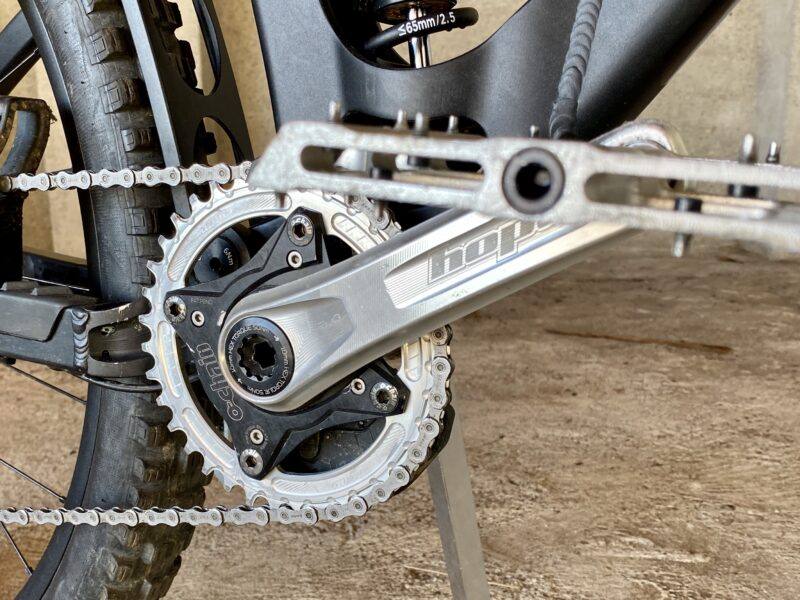
Hope Evo Cranks £250 / €292
Hope N/W Chainring £40 / €47
Hope S/S BSA73 bottom bracket £105 / €123
More Hope goodness. The Evo cranks are solid – this pair took a massive flying rock hit sometime when they were on my G1. I’m confident that impact would have finished off a pair of carbon cranks, or at least I would never trust riding them again after that. Solid cranks and easy to set up. A nice short overall length because of the nicely trimmed material after the pedal axle.
My only problem is that you need a 10mm Allen key (would be easier with an 8mm) and if you want to check the torque correctly you need a wrench that goes to 55nm – which I have never seen outside of a bike workshop – it’s just not the kind of tool that the average mountain biker has.
The N/W chainring does what it is supposed to, and the stainless steel bottom bracket seems to last for ages. Expensive, but durable and you can buy new bearings seperatly without replacing the cups.
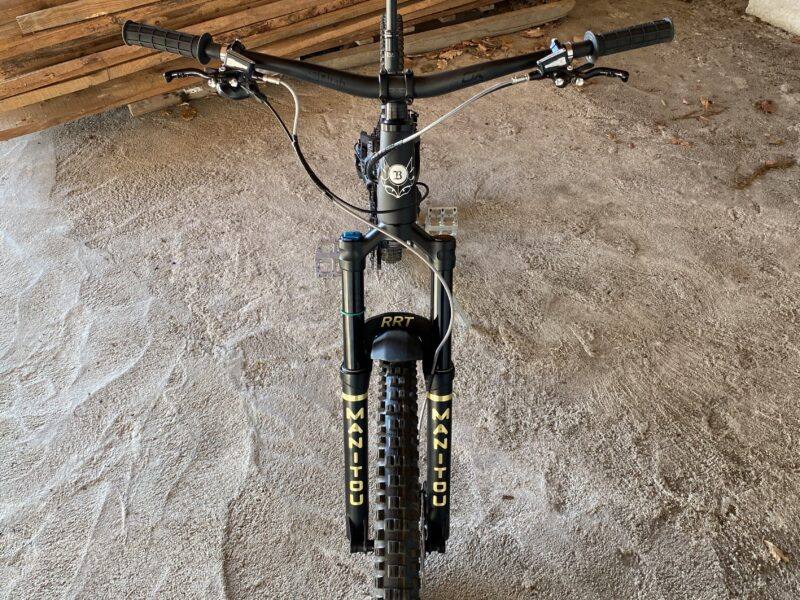
Manitou Mezzer RRT, Rulezman Race Tune, 170mm €1600
I started with the Mezzer in 180mm with recommendations from Rulezman. The ride dynamic at the front was too high, too slack and the fork wouldn’t settle into its sag enough. It was still great overall to ride and I prefer this problem over being too steep/low/soft at the front.
I wanted more sag for grip, I could run it at slightly lower pressure but this meant a lack of support on high-speed hits and big holes – bloody good overall but we could make it better.
Back to Rulezman for his new RRT (Rulezman Race Tune) upgrades to the Mezzer. I don’t know exactly what he did but we dropped the travel to 170mm and he reduced the friction A LOT (he suggests 75%), these two factors meant the fork was now sagging around 21-22% instead of 12-15% in previous settings. This proved to be a good match to the rear (which we also dropped a spring rate, to 350lb / 32% sag at the wheel /18mm at the shock shaft).
The Mezzer was softer, had more sag (21/22%), less friction, but more midstroke support and end stoke support. Thumbs up all around! Check what Rulezman did here with the friction in the lower. In terms of front-rear balance, we now had 37mm fork sag with 49mm rear wheel sag on the flat – should be closer to 50/50 balance when descending, nice.
The spring curve is basically perfect, I think it would be very hard to argue with that. The damping provides all the support you could ever need with no harshness. This fork has to be one of the best in the world. This is one of the parts I don’t really have much to say about, it just does what a fork should do perfectly!
This is one of only 2 Mezzer RRT in existence! There will be a third, which I have a deposit paid on, which will be given away to a lucky winner – go to the competition page here.
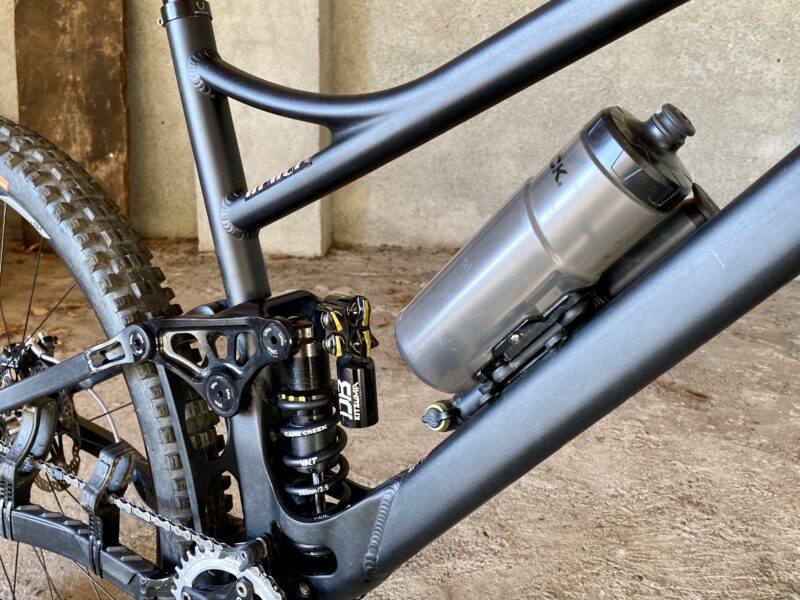
Cane Creek Kitsuma 205mm x 65mm Trunnion – Rulezman settings and VALT spring €920
So some of the parts I had for this bike already from previous jobs, including a 160mm DT Swiss F535 fork. I ordered this in 160mm sometime in 2020. When I finally got the fork on the bike it seemed low, then I saw the stealthy “140mm” sticker, facepalm. Too late to return it now, and no travel adjustment options to get it up to 160mm without a serious change of air spring and damper units. Out of the box, it felt like a great fork for the 20km I rode it. But just too short in travel for this bike.
I had bought a nice lightweight DT R535 shock to match, which also felt great for 20kms. Then failed completely. I don’t know what happened but I returned it to Bike24 who offered me a full refund – I asked if they could tell me what the problem was, but they couldn’t. If it was a simple fault they thought would not normally happen I would have happily tried another DT shock, but the explanation-free answer seemed suspicious to me, so instead of wasting any more time I just ordered another tried and trusted Kitsuma. But the lightweight Downcountry build was failing now! One wheel gone and replaced for a heavier one, and one lightweight shock replaced with a heavier coil version – would I ever be able to ride to the top of a hill again with this bike?
The Kitsuma. I keep saying it, but I believe it’s the best shock you can buy in 2022: lower price than most of the other top-end products, the widest range of adjustment of any shock so no need for re-tuning for each bike or rider. Coil, so it has that elusive ‘coil-like feel’ that is still trying to be achieved with air… Low hysteresis, twin-tube design, climb switch as standard with full lockout plus the CS mode which increases low-speed compression AND rebound. Plus the damping can easily handle any amount of heat from normal riding without noticeable change.
32% sag at the wheel and I still haven’t felt it bottom out harshly with only 155mm travel. A great product when you have the settings dialled in. I can only think that anybody who doesn’t like this shock had it set wrong, has it on a bike that doesn’t suit them, or doesn’t know how correctly set up suspension should feel. With such a wide range of adjustments, anything is possible so they can be the only answers. I’m not being arrogant here, or saying someone is wrong, but when you can adjust it to nearly anything they can be the only answers.
The only downsides are that the coil retaining collar is tough to turn because of an o-ring inside. This is to stop it unwinding when riding, but I think an EXT (moto-style) grub screw is a better option to stop the collar unwinding, and I don’t think this happens often anyway? You can make it easier to turn with some heat from a gun, and once your spring rate sag is set that shouldn’t be an issue very often.
Similarly with the tool-free dials. They are tool-free which is great, but, like the spring collar can be tight to turn and hard to feel/hear to count the indexed clicks – now I just count the visible turns from closed, much easier as low-speed has one full turn and high speed has two – simples.
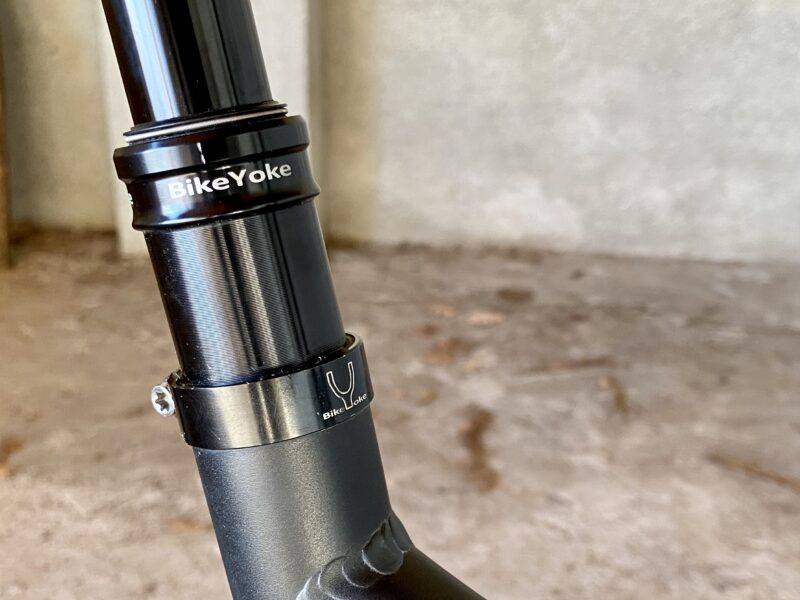
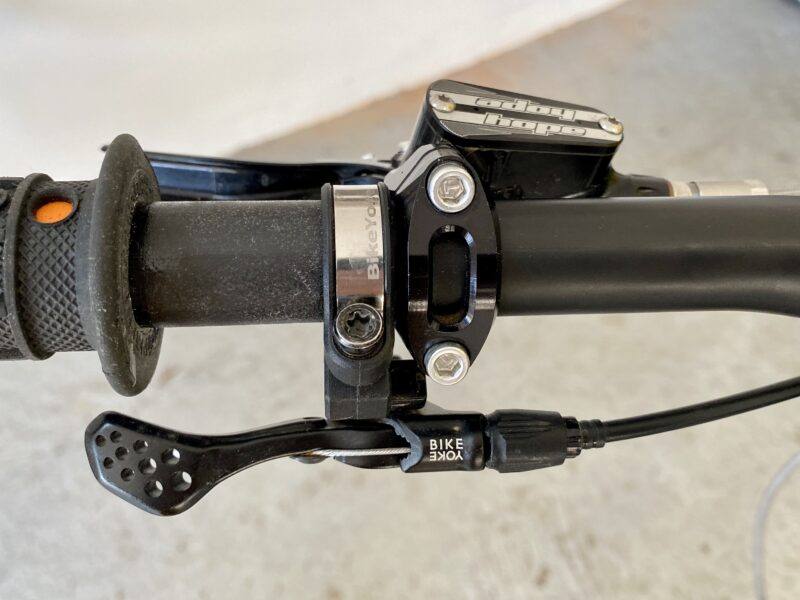
BikeYoke Revive 185mm Drop €460
BikeYoke Triggy Alpha lever
BikeYoke Squeezy clamp €29
BikeYoke parts are great. I have never had a single problem with any of their posts and have had around 20x of them for various amounts of time on different bikes.
The Revive dropper has a unique feature in that it can easily ‘revive’ itself if its develops play: put a 4mm allen key in the post head, turn it, drop the post, close the 4mm and the post is bled like new. It also comes with a little lever you can leave in there. The newer Triggy Alpha offers more adjustment to get it exactly where you need and a sealed bearing to further smooth out the actuation.
The Squeezy seat post clamp is collar-less so helps it clamp up nicely, and with the Ti-bolt and a 7.9g total weight, you can really feel the extra speed when climbing. That is sarcasm.
I initially ordered the whopping 213mm travel dropper for this bike, but due to the seat tube length it was much too high for my riding height, so I changed for 185mm. But! The positive of this is now I have another live giveaway with a choice of this installed but unused 213mm x 31.6mm Revive, or the 213mm x 34.9mm Revive.2 that was barely used, but terribly scratched by the Norco Shore. Link here to the raffle which includes some other nice Bike Yoke Goodies.
SRAM GX Eagle
Chain + Cassette €205
Shifter €35
Derailleur €110
After giving up on the Rotor hydraulic drivetrain, we chucked this old SRAM stuff on which gets on with the job. All parts were used with the exception of a new derailleur. Didn’t snap any chains, but the derailleur came loose once and was tuned back to perfection 3x times in around 12x rides.
OChain €299
I’m a big fan of the OChain on all bikes. I’m still arguing with Rulezman as he doesn’t think it works, on paper, but there is definitely something different when using it that I can’t explain. It did help to smooth out the Titan, as it does have quite a high pedal kickback in some situations. Rulezman has a nice video talking about this too. I would consider buying a smaller chainring than the 36t installed after speaking with Dave about this.
It does reduce pedal kickback at low speeds, but also I think it helps to dampen the chain flap on the top and bottom chain lines. This just gives you a quieter and smoother bike, and reducing chain slap could also possibly reduce kickback too.
Downsides: you could possibly lose a tiny bit of pedalling efficiency with the increased engagement, but that doesn’t really bother me – once you start pedalling and it is engaged that is it. Maybe if I was doing trials or loads of XC racing I might want a super-fast engagement hub/chainring but for the minimal number of engagements per ride compared to the many kilometres of descending more smoothly over bumps, I will take the OChain.
It could possibly reduce efficiency in another way, as you are always pushing against the small rubber dampers/stops inside the unit when pedalling.
Oh, you can also win one here: to fit most cranks, and now there is an eMTB version too. I’ve used these on all types of bikes now, from trail to high-pivot DH bike with idler wheel – the Ochain has improved the bike every time in some way.
Fidlock 750ml bottle and magnetic carrier €39
After a number of years of not actually being able to do a bike ride, only faking photos for the ‘gram, changing to a bike with a bottle cage mount meant that I could go riding again for more than 7minutes and not die of thirst…
It’s a plastic bottle that like all bike bottles, will make the freshest water taste disgusting after seconds. But, the Fidlock magnetic bottles are very easy to pop back on to the ‘cage’ when riding too. Although the EDC pump on this combo does block the bottle twisting slightly and makes it a bit harder to remove.
OneUp Components EDC Tool €160
I love the EDC tool from OneUp as in 2022 all bikes should have the tools integrated that they need to fix themselves on the trail. But, I have given up on running it inside the headtube. The cassette tool pre-load cap (instead of a normal star nut/headset cap) always works itself loose – and this has happened on multiple bikes and multiple times, and is worse with single crown forks. Especially annoying when the headset on a single crown fork keeps coming loose and you need to tighten it and align the steering each time. I’ll give up on this and go back to normal star nuts and top caps.
The OneUp EDC pump is a better solution to steerer storage as the EDC tool fits inside it nicely, though you lose the chance to store a C02 cartridge.
Schwable Eddy Current 29″ x 2.4″ €110
CushCore XC F+R €169
I still like the Eddy Current tyres considering I mostly ride enduro stuff on dry/rocky trails. They have a nice rounded profile. Very very predictable due to the long rectangular blocks offering tonnes of surface area to push against laterally when leant over. They also brake really well and roll well. I keep thinking about cutting the right-angled leading edge off them to 45º but not sure if I have the patience to do that. This would cut out the low rumble they create when climbing on tarmac and might speed them up slightly. But if you want to save a few quid, you can use them for a few months in one direction, then flip them to get a fresh braking edge and longer life!
Super Gravity casing is also great. The sidewall is like a DH tyre for support/stability and rim protection. The thinner and more flexible casing underneath the crown of the tyre and the blocks gives better rolling resistance and grip. The big blocks also seem to offer more puncture/pinch protection than a similar Hans Dampf of Magic Mary simply because more of the tyre carcass is protected by the blocks.
Conclusion:
This build comes in around €8871, excluding all the bits and pieces like tubeless sealant, tape, tools, etc. But, after much too long, I’ve finally built a killer machine: a bike that can do anything. Firm and responsive enough for XC around trail centres, supple enough for massive grip in all conditions and enough stored in the bank to take on proper DH runs without much problem. Maybe the perfect UK all-rounder?
Weight was saved where I could, and the broken parts were replaced where they couldn’t. Aside from the weak brakes, I couldn’t consider doing any more changes to it except diving deeper and deeper into the minutiae, but that’s just for the last few percent of performance, I’m over 95% happy with it.
Great bike, would recommend. All these reviews are truly independent, and you can support them by buying tickets here to win this bike!
Full GiveAway Spec:
Banshee Titan XL, Black Anodized – €2349
Standard and Long +10mm dropouts
Manitou Mezzer RRT, 170mm – including settings from Rulezman. €1600
Cane Creek Kitsuma 205mm x 65mm Trunnion – including settings from Rulezman and VALT spring to suit your weight. €920
ProGrips Moto Grips €20
SQLab 30X Carbon 16º High – €229.95
SQLab 80X Stem, 35mm – €89.95
SQLab 611 Active S-Tube €149.95
Works Components Angleset -2º £55 / €65
Hope Tech3 E4 brakes, braided S/S hoses £370 / €433
180mm Floating Rotors £90 / €105
Galfer Green Pads €50
Hope Evo Cranks £250 / €292
Hope N/W 36t Chainring £40 / €47
Hope S/S BSA73 bottom bracket £105 / €123
OChain €299
Newmen Advanced SL X.A.30 Carbon Front wheel €680
Newmen Evolution SL E.G.30 Alloy Rear Wheel €400
Schwable Eddy Current 29″ x 2.4″ €110
CushCore XC F+R €169
SRAM GX Eagle
Chain + Cassette €205
Shifter €35
Derailleur €110
BikeYoke Revive 185mm Drop €460
BikeYoke Triggy Alpha lever
BikeYoke Squeezy clamp €29
Fidlock 750ml bottle and magnetic carrier €39
OneUp Components EDC Tool €160
Approx £7588 / €8871
No pedals. Global shipping included.
I’ll chuck in any extra derailleur hangers, original headset, and some brake pads- whatever I can find.